Back to blog posts

Live Streaming Events as Easy as 1, 2, 3

Today we’re sharing some wisdom on live streaming events with Cinamaker from last week’s Free Style Experiment with MICxSIC at the Apache Cafe, right here in Atlanta,GA.

As an artist, entrepreneur, or any other type of creator, connections are key. Whether they be real life networking connections or connections on the web, catching the right people at the right time and sharing your brand with the right audience is what will ultimately make or break your success.

MICxSIC, Atlanta-based rapper and MC, is an artist who truly understands the importance of connections. Despite being from the same city, MICxSIC and Cinamaker first networked at SXSW 2017, almost 1,000 miles away in Austin, Texas. Mic believed in the power Cinamaker had to connect new people to his music, and we believed in the power of Mic’s music to bring people together. Finally this past Tuesday December 5th, we were able to combine our powers in a hugely successful live stream of his monthly event, “The Freestyle Experiment.” (Watch it here!)

Because we specialize in multi-camera, mobile, live video production, this event was beyond any average live stream — and The Freestyle Experiment was the ideal event to show it off. By using three unique angles, including a wide shot and two vantages from both sides of the stage, we were able to capture the unique character and spontaneity of the night and share it with the world.

In the three plus hours of the event, the cameras and connections didn’t falter once, and by the end of the night, the live video had been shared 39 times! All this with just an iPad, three iPhones, and some ethernet equipment.

We executed this live stream with just three basic, well-planned steps and you can do the same. Start by downloading the Director Pad and Cinamaker Capture apps to your tablet and smartphones, and the rest is easy as 1, 2, 3!


1) Pack Your Equipment

Live streaming events successfully requires thorough planning and packing. But before you grab anything, know where you’re going, that means both physically and on the web. Where are you streaming? What internet options do you have? What space are you working in? These are all questions that can be answered with a quick brainstorm and location scout before getting started.

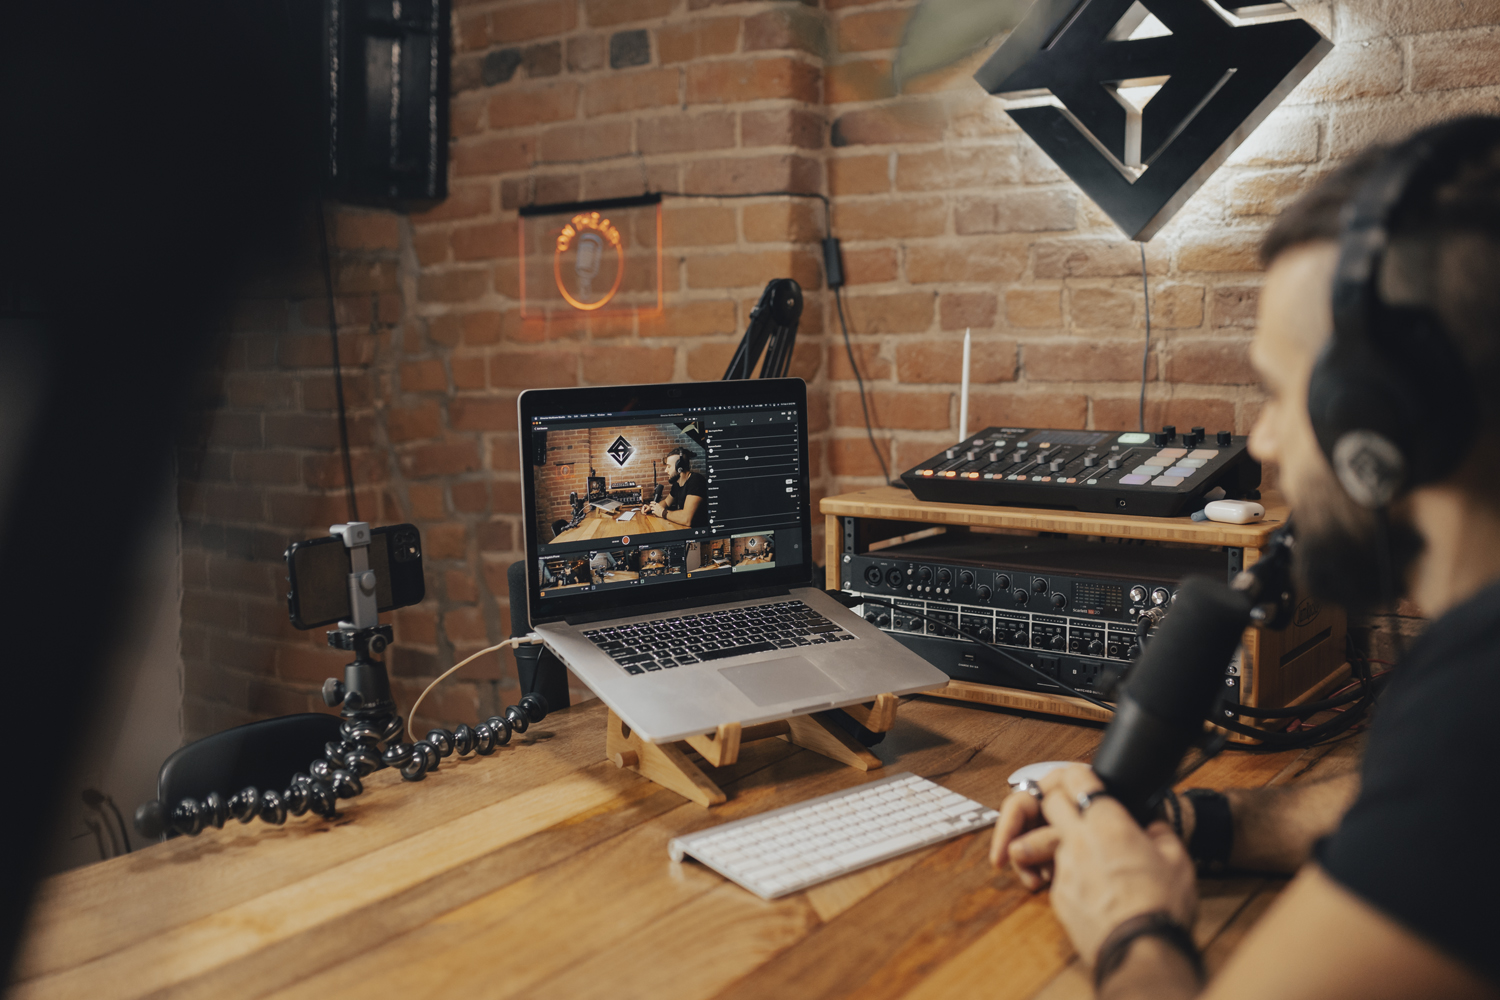
Cinamaker can stream wirelessly in a snap, but for a fool-proof connection, we recommend creating a wired ethernet setup to a secure router. These words may sound a bit intimidating but we promise, if we can do it, so can you. Just check out our wired configuration tutorial (video coming soon) to find out what gadgets to add to your checklist. Remember, if you want to grab audio from a mixing board, which is what we did for The Freestyle Experiment, just get a line in from the board to one of your smartphones’ audio jacks.

Once you have the wires, think about how you want to mount your smartphone capture devices. If you think you’ll be following your subjects a lot, or if the even isn’t too long, having people to hold each camera may be the best option. Since our event was so long and taking place in a fixed setting, we used our homemade camera stands which can be easily recreated with some mic stands and screw-on phone mounts.


2) Setup with Care

Now that you know the space and the tools you’ll be working with, you can decide how much time you’ll need to get packed and setup. It took three of us about 15 minutes to pack up all our equipment, and then only about 30 minutes to setup our multi-angle studio on location. Still, we arrived well in advance to accommodate any possible snags or last-minute adjustments. Don’t forget to bring gaffing tape to secure wires and prevent tripping, and make sure to designate a safe spot with a good view to keep your tablet at during the event. You’ll want to stay out of people’s way but still be in the action so you can switch between cameras at just the right moments.

Part of your setup will include inputting your livestream destination and naming your stream. Think wisely about which platform will be best for you to stream from (YouTube, Facebook, Periscope, or any other RTMP destination) and also about what name will intrigue and inform the most viewers.


3) Hit “Go Live” & Share, Share, SHARE

Double check your connections, wait for your cue, and then hit the big red “Go Live” button! Want to live stream and record at the same time? No worries. Cinamaker can do that, too.

Now that your stream has begun, don’t be afraid to share and ask your viewers to do the same! Interact with viewers in the comments and make sure to listen to any helpful input about volume or visibility. You can check out more video marketing and sharing tips here.

When you’re all done, keep sharing your live stream or edit the footage in the Cinamaker app or with your favorite software to create a highlight video.

Live streaming events in arts, business, and every industry is a great way to get people connected with your brand.  Download Cinamaker to start making connections today!

Share:

Other Articles

iphone recording a video podcast using Cinamaker
How to start a hit podcast—even on a budget
Preview
Create pro-level video podcasts using Zoom
Preview
professional video podcast studio setup using Cinamaker
Why video podcasts are the fastest way to build your brand
Preview
professional podcast studio
Announcing our free webinar: ‘Create Video Podcasts Like a Pro’
Preview
Cinamaker 2.23 Release Notes
Preview
Cinamaker makes recording and editing your Zoom sessions a breeze; in real-time or afterward.
How to Give Your Zoom Meetings a Much-Needed Upgrade
Preview
Cinamaker 2.19 Release Notes
Preview
Cinamaker Makes Remote Guests and Cameras a Breeze via the Zoom Meeting SDK
Preview
Back to blog posts

Daytime Lighting Guide for Film: Harnessing the Sun

Here’s a brief daytime lighting guide for all you filmmakers venturing to the great outdoors. Learn how to get the most from the sun with tips, tools, and more. 

While the temptation may exist to look to that great big ball of fire in the sky as an effective source of outdoor lighting for your video shoots, don’t give in, at least not completely. Although sunlight does fill the entire daytime sky, the angles of the sun rays are directional and this will cast shadows on your film’s subjects. You’ll also face issues with contrast, changeable weather and lighting conditions, and your characters’ movements or the scene blocking.

Of course, there’s not just one, but two outdoor scenarios: day and night. However, both can pose equal challenges. What’s key is to compose your shot and lighting design through the eye of the camera, not your own. Why? As suggested by Videomaker, “Outdoor cinematography is a challenge because the camera does not adjust for contrast as smoothly as the human eye.”

Filming During The Day

As we’ve previewed, daytime videography has unique challenges and the sun can actually be a bane or boon to your production. Attention must be paid to cloud coverage, sun angle, and reflective materials on buildings and structures and colors bouncing off colored surfaces. Sunlight and daylight cannot be counted on as they’re ever changing throughout the course of the day. After all, there are always different weather conditions, not to mention locations, latitudes, and even seasons. All of these factors work to alter the tones, colors and even shapes of a scene. Therefore you must control your lighting as it falls on the scene, through the camera’s digital sensor.

Some issues can be combatted by adjusting your camera’s settings including white balance, light metering control, lens speed, and iris control. Your desired outcome should remain your inspiration behind any lighting layout. The first step should be scouting your location. Observe the natural lighting sources, electrical outlets, as well as the space and the subject’s movements within that space.

Getting Technical

With all of these variables during an outdoor shoot, the first thing you need to do is see your scene blocking through the camera and adjust accordingly for contrast. You should find the optimal range of contrasts between elements within the scene such as foreground, background, and any other elements that would give the image depth or convey your desired mood or tone.

The digital sensor on a camera doesn’t adjust to changeable contrast conditions as quickly and flawlessly as the human eye. You’ll have to position your characters, lighting, and framing accordingly. Don’t let this deter you. A well-lit outdoor scene can bring a natural beauty to the film. Point-and-shoot cameras can capture images well enough if filming in sunlight that’s not too bright. In most cases, however, you should consider manually setting and locking the exposure and focus on your camera or smartphone.

Using The Sun

The sun doesn’t have to be your enemy; it’s a great source of ambient light. It’s a source that can cast a harsh shadow and change on a dime, but also a light source that can be utilized to achieve amazing effects. Think of a traditional three-point lighting setup and apply according to the ball in the sky.

The Sun As A Key Light

While this may seem to be the most practical use for the sun’s rays, it does produce the harshest shadows or modeling, which gives the effect of an image being enhanced by the shadows. This becomes a more workable scenario with the introduction of the other three-point lighting elements, diffusion materials and reflectors. This will also place the sun behind the camera to negate lens flare.

The Sun As A Key Light During The Golden Hour

The “Twilight Hour” or the “Golden Hour” doesn’t last long. It happens twice per day, roughly an hour before sunset and an hour after sunrise. These terms are given for the soft color temperature, golden hue of the sunlight and even lighting of your subjects and set. Find the best time for your shoot using this handy Golden Hour calculator.

Using The Sun As A Backlight

By creatively using the angle of the sun, you can create a really nice rim or halo effect around your characters or subjects. The optimal time to achieve this effect is when the sun is at a 45-degree angle. This also avoids having your actors squinting from the glare.

The Gear You’ll Need:

In sum, while nature can provide you with a powerful light source, you’ll need to control it. To do so, you’re going to need some gear. The two main elements are:

Lights

While you might be tempted to depend on the sun as your only source of lighting, it will be wise to ensure access to an electricity supply and have ample studio lighting available. You’ll probably want to mimic the daylight temperature with your lights. This will require lights with a daylight temperature of 5,200 degree Kelvin or more, or the use of gels to change the color temperature of your existing lights. However, remember that gels will reduce your light’s intensity.

Reflectors/ Diffusion/ Silks/ Flags (Scrims, Material, etc.)

This is what you are going to use to control your sunlight, even-out contrast levels, and light your subjects, especially for closer shots.

Reflectors, as the name suggests, will reflect or bounce the light in a specific direction. This can act as a very good fill light for your characters or can illuminate a background area to create depth. Reflectors come in many sizes and materials, from a reflective piece of white cardboard to spring-loaded reflectors that fold away for storage, usually colored in white, silver, or gold. They also come in a variety of forms, from light reflective cloth to art-store whiteboard to flexible reflectors used for photography.

Diffusion material, such as scrims on lights or a large overhead silk, will soften the light source and give the image less contrast in the camera. This is great for shooting close-ups. Why? Shooting close coverage under silk offers many advantages because it takes the directionality out of the sun and creates a diffusion that will reduce your shadows, ultimately giving you a more even palette to play with.

Flags are usually made from a lightweight black material, such as plywood, cloth or perhaps even some polystyrene sheets that have been sprayed with black paint. These will allow you to block sunlight and other light sources from your scene or subjects.

Takeaways

As with any shoot, preparation is key. Once you know your location, you’ll detect how to control and manipulate the sunlight to best suit your production’s needs. With careful planning, this can even be achieved on a minimal budget. The production will get more complicated if there are a lot of characters or camera movement. Continuity of lighting angles and contrast is your biggest nemesis here. Some productions will cater to shooting during specific hours over a period of days, but this isn’t always feasible. Regardless, you can mitigate your continuity problems by putting your digital brain to work and using your human capacity to see what the lens sees and make appropriate adjustments in-camera and on-set. You can achieve wonders. Just don’t forget your sunscreen!

To find even more lighting, filming, or video marketing tips, check out our blog.
Still looking for the most affordable, portable, multi-camera solution for your production? Download Cinamaker from the App Store today, and read more about our Cinamaker Studio apps here.

Share:

Other Articles

iphone recording a video podcast using Cinamaker
How to start a hit podcast—even on a budget
Preview
Create pro-level video podcasts using Zoom
Preview
professional video podcast studio setup using Cinamaker
Why video podcasts are the fastest way to build your brand
Preview
professional podcast studio
Announcing our free webinar: ‘Create Video Podcasts Like a Pro’
Preview
Cinamaker 2.23 Release Notes
Preview
Cinamaker makes recording and editing your Zoom sessions a breeze; in real-time or afterward.
How to Give Your Zoom Meetings a Much-Needed Upgrade
Preview
Cinamaker 2.19 Release Notes
Preview
Cinamaker Makes Remote Guests and Cameras a Breeze via the Zoom Meeting SDK
Preview
Back to blog posts

Lighting for Action Shots (Get Them Right)

It’s true, lighting can make or break a shot. Simple lighting differences are able to elicit incredibly diverse audience emotions. For example, the soft light for a couple sitting together holding hands at sunset has a far different look than the dark lighting of someone standing at a cemetery in the rain. Lighting for action shots requires the same nuanced attention to detail.

When producing an action shot, you want the audience to feel excited for the subjects and maybe even a little nervous about whether they will succeed. But how are these emotions drawn from the audience? Here’s some tips to help you achieve the look and feel you want during your next action video with lighting.

Contrast

For action shots that are more akin to a superhero movie than to a sporting event, contrast is key. Think about your favorite underdog stories — right before the protagonist meets the villain, scenes involving a long dark hallway with shafts of light breaking through come to mind, don’t they?

High contrast lighting techniques such as this allow you to add a dynamic edge to your shots as well as provide a visual metaphor for good (light) versus evil (dark). You can maximize these contrasts in post-production editing. However, make sure not to compromise aesthetic balance for excessive brightness or shadows.

Brightness

While contrast is a good omen for conflict, complete darkness without any light breaking through during a true action sequence is not ideal. When a set is dark, motion blurs are more likely to be a problem. Shooting in good light will minimize potential blur and allow viewers to see the subject matter in the image much more clearly, making it easier to tell the story through facial expressions.

Shutter Speed

When cameras are left on automatic mode, they automatically try to adjust to the light that is in the shot. If the light is low – such as at night or in a dark setting like in a basement – this automatic setting tries to adjust to the changing lighting as people move.

This constant changing does something that no producer wants in a fast shot: it lowers the shutter speed. Most learn to set their shutter angle at 180 degrees, a 1/48 shutter speed, but for an action shot it’s better to set it at a shutter speed that is double the frame rate being used. However, if you want a blurred background to show movement, a lower shutter can help accomplish this. Instead of setting your shutter to 1/48, try setting it to 1/125 to see the changes that this produces. You’ll find that this makes each movement within the image significantly more pronounced, enhancing the crispness of the motions.

Closeups

Another way to improve the quality of your action shots is found in the width of the shot. It may seem like you should go for wide shots in order to capture all of the action happening in the scene, but this simply isn’t true. For the most part, tighter shots actually intensify the visuals, capturing more of the action. Watch any action movie and you’ll see this method is frequently used particularly during fight scenes.

Framing for closeups makes the subject’s actions seem larger, and therefore, more important. Keep the lighting dramatic by using directional light that will create shadows to emphasize your subjects’ most intense features. This can be achieved with strong light from above or below; just play around with your actors and equipment first to find the best setup.

Glow

Finally, give your action shots the shimmering, steely shine they deserve with well appointed reflectors, good timing, and maybe even some makeup.

To give an ethereal glow to a hero or heroine, bounce light directly onto their skin with a gold or silver metallic reflector disc. If you’re filming outdoors, capture the magic of the golden hour by shooting right near dawn or dusk. Remember, water also reflects and intensifies light. If your actors really break a sweat, it can translate into a dazzling effect on camera. Imitation tears and sweat made from glycerin can be used as well to create this steamy, powerful look.

Looking for even more lighting tips? Check out our blog to read about the best budget lights, multi-camera lighting strategy, and more! Need a new mobile studio solution for your shoots? Download Cinamaker for iOS now from the App Store and read more about our products here.

Happy Cinamaking!

Share:

Other Articles

iphone recording a video podcast using Cinamaker
How to start a hit podcast—even on a budget
Preview
Create pro-level video podcasts using Zoom
Preview
professional video podcast studio setup using Cinamaker
Why video podcasts are the fastest way to build your brand
Preview
professional podcast studio
Announcing our free webinar: ‘Create Video Podcasts Like a Pro’
Preview
Cinamaker 2.23 Release Notes
Preview
Cinamaker makes recording and editing your Zoom sessions a breeze; in real-time or afterward.
How to Give Your Zoom Meetings a Much-Needed Upgrade
Preview
Cinamaker 2.19 Release Notes
Preview
Cinamaker Makes Remote Guests and Cameras a Breeze via the Zoom Meeting SDK
Preview
Back to blog posts

Live Stream as a Tool For Brand Growth And Awareness

A live stream can be useful in myriad situations — yet when most people think of live streaming, events are often the first use-case that comes to mind. However, this is only one way to use a live stream video to your advantage.

For brands, whether they be personal or commercial, live streaming can be a powerful tool for growth and awareness. Live streaming as a marketing technique can serve its purpose with various tactics, and has even helped such well-known brands as Tough Mudder and Dunkin’ Donuts to further extend their presence and impact.

Announcements And Messages

Whether you’re filming the opening of a new location or showing off your company’s latest product, live streaming is a great way to spread the word of any news involving your brand. This method also allows your consumers to feel included and engaged on a personal level, rather than a scripted commercial or advert. Simply put, a live stream is more personal. It gives your audience the feeling that you are almost personally talking to them instead of talking at them. A single camera shoot might be most effective in accomplishing this sense of intimacy.

Questions and Concerns

Think about what you see at the end of almost any page selling a product. It’s typically the frequently asked questions, specifications, or purchasing details. Instead of addressing these questions as they accumulate and leaving it up to your customers to do the digging, you can bring answers to your customers or fans more quickly in a live stream format. This can help you talk directly to a large group of your customers and streamline any feedback or troubleshooting process.

Education

It’s entirely possible that your target audience knows little to nothing about your brand. A livestream is the perfect place for you to educate anyone who is watching about your brand story and brand value. In general, there’s one major tip for this: make your livestream succinct and interesting to watch. This can be difficult, if you don’t grab people’s attention immediately, they’ll likely tune you out or turn you off. So be creative and only include what really matters. With the popularity of DIY and other how-to videos today, there’s a lot of opportunity to create engaging, informative content that will encourage people to share your brand’s message with others. Again, being interactive with your audience is going to help.

Call to Action

Think about TV infomercials. At the end of each one, you usually hear something along the lines of “if you call now” or “this is a limited time offer.” While this was once a clever, effective tactic, it’s a bit outdated today. A live stream is an ideal, modernized way to share a limited time offer. Why? You know that your audience is watching you live, so obviously these viewers can’t miss the offer if they’re paying attention. If you can catch the sense of urgency in your live stream correctly, and you have a quality offer, you should be able to convince the majority of your audience to take action. A properly directed multi-camera shoot could be a particularly effective tool to help relay this sense of urgency.

Longer Messages

When you livestream, you don’t have to worry about cramming your message into a 30-second television ad. Instead, you have an unlimited amount of time to define and explain your product without any extra charge. This is perfect for conveying more complex ideas that are too long for a commercial but too dry to want to read about in an article or press release. With that said, use the time wisely. No one wants to feel as though they’ve wasted their time. That sort of feeling will ensure a lower viewer turnout the next time. Remember: live streams give you a lot of freedom, but you can’t take your viewers for granted.

Dramatic Flair

If your live stream is bland, you’ll begin to see diminishing viewer counts in subsequent live streams. At the end of the day, everyone wants to be entertained. One way to do this is by building a feeling of suspense. Don’t just drop something on the viewer. Set the stage. Lots of Television series, YouTubers, and musicians use this technique for special live streams right before a premiere or event. They often take viewers backstage or make them a part of the action by following the performer as he or she walks down the hallway before stepping on stage. While these situations may not perfectly apply here, finding exciting ways to keep viewers on the edge of their seats before making an announcement or reaching the climax of your show will create a sense of anticipation that keeps them watching and excited for more.

At the end of the day, your goal should be to give the impression that you’re continually producing engaging moments, and live streaming is the perfect tool to do just that!

Share:

Other Articles

iphone recording a video podcast using Cinamaker
How to start a hit podcast—even on a budget
Preview
Create pro-level video podcasts using Zoom
Preview
professional video podcast studio setup using Cinamaker
Why video podcasts are the fastest way to build your brand
Preview
professional podcast studio
Announcing our free webinar: ‘Create Video Podcasts Like a Pro’
Preview
Cinamaker 2.23 Release Notes
Preview
Cinamaker makes recording and editing your Zoom sessions a breeze; in real-time or afterward.
How to Give Your Zoom Meetings a Much-Needed Upgrade
Preview
Cinamaker 2.19 Release Notes
Preview
Cinamaker Makes Remote Guests and Cameras a Breeze via the Zoom Meeting SDK
Preview
Back to blog posts

A Holiday Home Movie to be Thankful For

This is one recipe you won’t want to miss.

Home movie making has evolved over the years, but no matter how many Thanksgivings you’ve spent together, there’s one thing you can always count on: the complete and utter insanity that is your family (especially if you’re the Bluths of Arrested Development).

Lucky for us, it’s 2017 and it’s likely that every single member of your extended family keeps a video-capable smartphone in their pockets at all times. This means you have no excuse not to capture each and every antic that Turkey Day will undoubtedly offer. Follow this quick recipe for home movie success and immortalize the horrors and humiliation of this holiday for years to come…

PREPARATION:

Assemble your camera crew

Your crew should be comprised of those members of your family who share your vision for organized chaos and penchant for documentary(ish) filmmaking. Cousins and mischievous uncles work especially well. Kids are also helpful for those tricky crowded kitchen shots. Sync your devices, review the ingredients, and divide and conquer.

INGREDIENTS:

The one who’s always late

always-late

The one who talks to the food

talking-to-the-food

The spice master

the-spice-master

The food snob

the-food-snob

The taster

taster

The family football game

family-football-game

The conversationalist

arguing

And just a dash of sassy grandma

sassy-grandma


ASSEMBLY:

Now that you’ve recorded they key elements for a hilarious home movie, simply review the footage and edit them together on your phone or computer.

PRESENTATION:

Your masterpiece has been cultivated, curated, and cut with perfection and is now suitable for sharing. Gather the whole family ’round the telly after desert for this final piece de resistance or go for a guerilla tactic by sharing on social media first and taking comments (or criticism) later. Just remember that whatever feedback you may receive now, your family will ultimately thank you for preserving this year’s festivities with the cinematic flourish it deserves.

Happy Cinamaking, and Happy Thanksgiving!

*featured image c/o Arrested Development (Fox, Netflix)

Share:

Other Articles

iphone recording a video podcast using Cinamaker
How to start a hit podcast—even on a budget
Preview
Create pro-level video podcasts using Zoom
Preview
professional video podcast studio setup using Cinamaker
Why video podcasts are the fastest way to build your brand
Preview
professional podcast studio
Announcing our free webinar: ‘Create Video Podcasts Like a Pro’
Preview
Cinamaker 2.23 Release Notes
Preview
Cinamaker makes recording and editing your Zoom sessions a breeze; in real-time or afterward.
How to Give Your Zoom Meetings a Much-Needed Upgrade
Preview
Cinamaker 2.19 Release Notes
Preview
Cinamaker Makes Remote Guests and Cameras a Breeze via the Zoom Meeting SDK
Preview

Sign up

Request a call

Get Free

Download Cinamaker Web-cam Driver